Part 8: Authentication
Building Authentication
Now we will add Authentication to our app. We don’t want anyone to be able to access our app. They would have to sign up. So to do that we will add Authentication. We will first add the frontend after which we will build the functionality.
What do we need to add here? Authentication is actually a combination of two forms. One for existing users where they will login with their existing credentials. The other is for new users where they can register.
Authentication - Frontend
We will create a new subdirectory called authentication in our components directory. The folder structure will then look like this:
frontend
 - src
  - subcomponents
   - main
   - navigation
   - authentication
In here we will create a Authentication.js file with our boilerplate code:
frontend/src/subcomponents/Authentication.js
import {Component} from 'react'

class Authentication extends Component {
  render() {
    return (
      <>
      </>
    )
  }
}

class LogIn extends Component {
  render() {
    return (
      <>
      </>
    )
  }
}

class Register extends Component {
    render() {
      return (
      <>
      </>
    )
  }
}

export default Authentication
and adding the import to our App.js file:
frontend/src/App.js
...
import Authentication from './subcomponents/authentication/Authentication'
...
We will want to create a form similar to our TransferForm where we can fill in our information. We therefore add the following code:
frontend/src/subcomponents/Authentication.js
...

class LogIn extends Component {
  render() {
    return (
      <>
      <Card
      className = "auth"
      >
        <Card.Body>
        <Form.Group className="mb-3">
          <Form.Label>Username</Form.Label>
          <Form.Control type="username"
          />
        </Form.Group>
        <Form.Group className="mb-3">
          <Form.Label>Password</Form.Label>
          <Form.Control type="password"
          />
        </Form.Group>
        </Card.Body>
      </Card>
      </>
    )
  }
}

...
I also create a Authentication.css file in the authentication folder where I add the following code:
frontend/src/subcomponents/authentication/Authentication.css
.form-control {
    width: 240px;
    margin: auto;
}

.auth {
    width: 32rem;
    background-color: #e3e3e3;
}
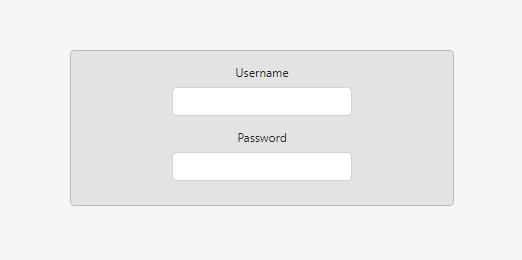
The first part will ensure that our text fields are a not as wide as the card and are centered horizontally in the card. The second that our card is a bit wider and has a darker color for more contrast between the background:
We also need to be able to login once we have entered our information, and should we not have an account we should be able to go to a Register screen. For that we add some Buttons:
frontend/src/subcomponents/authentication/Authentication.js
...

class LogIn extends Component {
  render() {
    return (
      <>
      <Card
      className = "auth"
      >
      <Card.Body>
        <Form.Group className="mb-3">
          <Form.Label>Username</Form.Label>
          <Form.Control type="username"
          />
        </Form.Group>
        <Form.Group className="mb-3">
          <Form.Label>Password</Form.Label>
          <Form.Control type="password"
          />
        </Form.Group>
        <Form.Group>
          <Button
          variant = "primary"
          >Login
          </Button>
          <Button
          variant = "primary"
          >To Register
          </Button>
        </Form.Group>
      </Card.Body>
      </Card>
      </>
    )
  }
}

...
and some css magic:
frontend/src/subcomponents/authentication/Authentication.css
...

button {
    width: 105px;
    margin: 6px
}
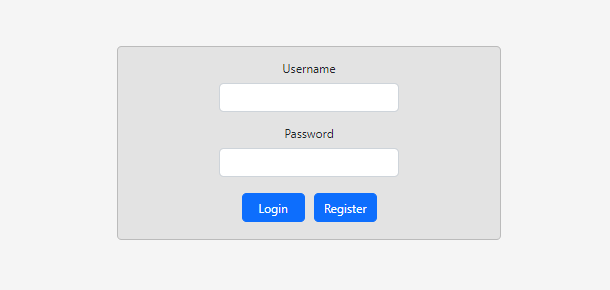
so that our button have equal widths (since the text does not have equal length) and there is some margin around them, making it look as follows:
Great, we now have our Login form. We also need to create our Register form. It will look similar to the Login form but with an extra field:
frontend/src/subcomponents/authentication/Authentication.js
...

class Register extends Component {
    render() {
      return (
      <>
      <Card
      className = "auth"
      >
      <Card.Body>
        <Form.Group className="mb-3">
          <Form.Label>Email</Form.Label>
          <Form.Control type="email"
          />
        </Form.Group>
        <Form.Group className="mb-3">
          <Form.Label>Username</Form.Label>
          <Form.Control type="username"
          />
        </Form.Group>
        <Form.Group className="mb-3">
          <Form.Label>Password</Form.Label>
          <Form.Control type="password"
          />
        </Form.Group>
        <Form.Group>
          <Button
          variant = "primary"
          >To Login
          </Button>
          <Button
          variant = "primary"
          >Register
          </Button>
        </Form.Group>
      </Card.Body>
      </Card>
      </>
    )
  }
}

...
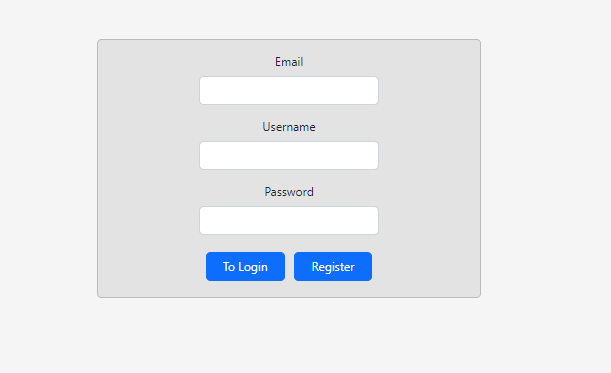
looking as follows:
This is nice, but we need to be able to toggle between the two, that if I press ‘To Login’ I’m transported to the Login page and vice versa.
We change the following code in Authentication.js
frontend/src/subcomponents/authentication/Authentication.js
...

class Authentication extends Component {
  render() {
    return (
      <>
      {this.props.state.route === 'login'
      ?
        <LogIn/>
      :
        <Register/>
      }
      </>
    )
  }
}

...
This way the Authentication component checks if the user is at the login screen, then it will toggle that one, elsewise t’other.
We need to add our Authentication component to our App component. Furthermore, we then need to pass state as a property to this component so it is able to check that. We do this in App.js:
frontend/src/App.js
...

class App extends Component {

  ...

  render() {
    return (
      <div className = "app">
        {this.state.route === 'overview'
        ?
          <Overview
          onRouteChange = {this.onRouteChange}
          />
        : this.state.route === 'transfer'
        ?
          <TransferPage
          onRouteChange = {this.onRouteChange}
          sendTransaction = {this.sendTransaction}
          onTxTextChange = {this.onTxTextChange}
          />
        : this.state.route === 'login' || this.state.route === 'register'
        ?
          <Authentication
          state = {this.state}
          />
        :
          <>
          </>
        }
      ...
This way the App renders the Authentication if the route is login or register. Furthermore, if the route is not known it will return an empty screen.
Great, our App will now render the correct screen depending on where the user is. But the user still has to be able to navigate to the different pages. We do this in a similar fashion as before, where the the onRouteChange method is invoked if the button is clicked. First of all, the onRouteChange function needs to be available to the Authentication component:
frontend/src/App.js
...

class App extends Component {

  ...

  render() {
        ...
        : this.state.route === 'login' || this.state.route === 'register'
        ?
          <Authentication
          state = {this.state}
          onRouteChange = {this.onRouteChange}
          />
        ...
        }
      ...
and the Authentication component itself must descend it to the lower-level components that will use it, the button:
frontend/src/subcomponents/authentication/Authentication.js
...

class Authentication extends Component {
  render() {
    return (
      <>
      {this.props.state.route === 'login'
      ?
        <LogIn
        onRouteChange = {this.props.onRouteChange}
        />
      :
        <Register
        onRouteChange = {this.props.onRouteChange}
        />
      }
      </>
    )
  }
}

...
No, even further down:
frontend/src/subcomponents/authentication/Authentication.js
...


class LogIn extends Component {
          ...
          <Button
          variant = "primary"
          onClick = {() => {this.props.onRouteChange('register')}}
          >To Register
          </Button>
          ...

...

class Register extends Component {
          ...
          <Button
          variant = "primary"
          onClick = {() => {this.props.onRouteChange('login')}}
          >To Login
          </Button>
          ...

...
Go ahead, try it now! By clicking ‘To Login’ you are transported to the Login screen and vice versa. Amazing!
Now we need to build the functionality that will actually sign us in or registers us up, almost.
Before we can build the backend functionality there is one last thing we need to take care of. The fields that are typed in the Authentication fields are not saved somewhere. So you can type whatever you want and nothing will happen.
We will use a similar technique as for the tracking of the TransferForm fields.
We first add a new object to App.js and change our state:
frontend/src/App.js
...

const initialLoginDetails = {
  email: '',
  username: '',
  password: ''
}

...

const initialState = {
  route: 'login',
  loginDetails: initialLoginDetails,
  txDetails: initialTxDetails
}

class App extends Component {
  ...

  sendTransaction = async () => {
      const requestOptions = {
        ...
        body: JSON.stringify({
          username: this.state.loginDetails.username,
          txDetails: this.state.txDetails
        })
    ...

...
On initialization the app will be laoded with these initial objects. This ensures consistency.
We then take our previous defined method onFormTextChange and have the Authentication component inherit it:
frontend/src/App.js
...

class App extends Component {

  ...

  render()

        ...

        <Authentication
          state = {this.state}
          onRouteChange = {this.onRouteChange}
          onFormTextChange = {this.onFormTextChange}
        />

        ...
and have Authentication inherit it to the even lower-level components:
frontend/src/subcomponents/authentication/Authentication.js
...

class Authentication extends Component {
  render() {
    return (
      <>
      {this.props.state.route === 'login'
      ?
        <LogIn
        onRouteChange = {this.props.onRouteChange}
        onFormTextChange = {this.props.onFormTextChange}
        />
      :
        <Register
        onRouteChange = {this.props.onRouteChange}
        onFormTextChange = {this.props.onFormTextChange}
        />
      }
      </>
    )
  }
}

class LogIn extends Component {
        ...
        <Form.Group className="mb-3">
          <Form.Label>Username</Form.Label>
          <Form.Control type="username"
          onChange = {
            (event) => {
              this.props.onFormTextChange(
                'loginDetails', 'username', event.target.value
              )
            }
          }
          />
        </Form.Group>
        <Form.Group className="mb-3">
          <Form.Label>Password</Form.Label>
          <Form.Control type="password"
            onChange = {
              (event) => {
                this.props.onFormTextChange(
                  'loginDetails', 'password', event.target.value
                )
              }
            }
          />
        </Form.Group>
        ...

class Register extends Component {
        ...
        <Form.Group className="mb-3">
          <Form.Label>Email</Form.Label>
          <Form.Control type="email"
            onChange = {
              (event) => {
                this.props.onFormTextChange(
                  'loginDetails', 'email', event.target.value
                )
              }
            }
          />
        </Form.Group>
        <Form.Group className="mb-3">
          <Form.Label>Username</Form.Label>
          <Form.Control type="username"
          onChange = {
            (event) => {
              this.props.onFormTextChange(
                'loginDetails', 'username', event.target.value
              )
            }
          }
          />
        </Form.Group>
        <Form.Group className="mb-3">
          <Form.Label>Password</Form.Label>
          <Form.Control type="password"
          onChange = {
            (event) => {
              this.props.onFormTextChange(
                'loginDetails', 'password', event.target.value
              )
            }
          }
          />
        </Form.Group>
        ...


